Is That Level Still Good Enough?
|Hello traders! This week’s newsletter will cover a topic that often confuses new traders. That topic is the uncertainty of whether or not a supply or demand level is still good enough to trade.
Before we get started looking at some charts, I do have to mention that NOTHING WORKS EVERY TIME. On any chart you will probably be able to find moves that would have worked if you had broken some of our basic trading rules. Some of these rules include: don’t trade breakouts, trade in the dominant trend direction, etc., etc. However, sticking to the rules will allow you to trade for years if not decades instead of for a few weeks. One of my favorite analogies is speeding through a school zone – you can get away with it once in a while, but the risks highly outweigh the reward. What are the risks when you speed through a school zone? Speeding tickets, possibly losing your license and, far worse, hurting someone. What would be the reward? Saving yourself five seconds of travel time? Hardly a good reward to risk ratio! The point is this – drive smart and you can drive forever; trade smart and you can trade forever!
On to this week’s lesson. In Online Trading Academy’s core strategy, we expect traders to sell in quality supply zones and buy in quality demand zones. Our proprietary Odds Enhancer scoring system clues us in on what constitutes a quality zone. Now, what do we do if the zone has already been hit, where we missed the first good entry? The most conservative traders I know use a “one and done” approach. If they don’t get the first entry at a new zone, they wait for a new zone to establish itself. This is fine for the most conservative traders, but I personally believe that this will cause you to miss too many future trades.
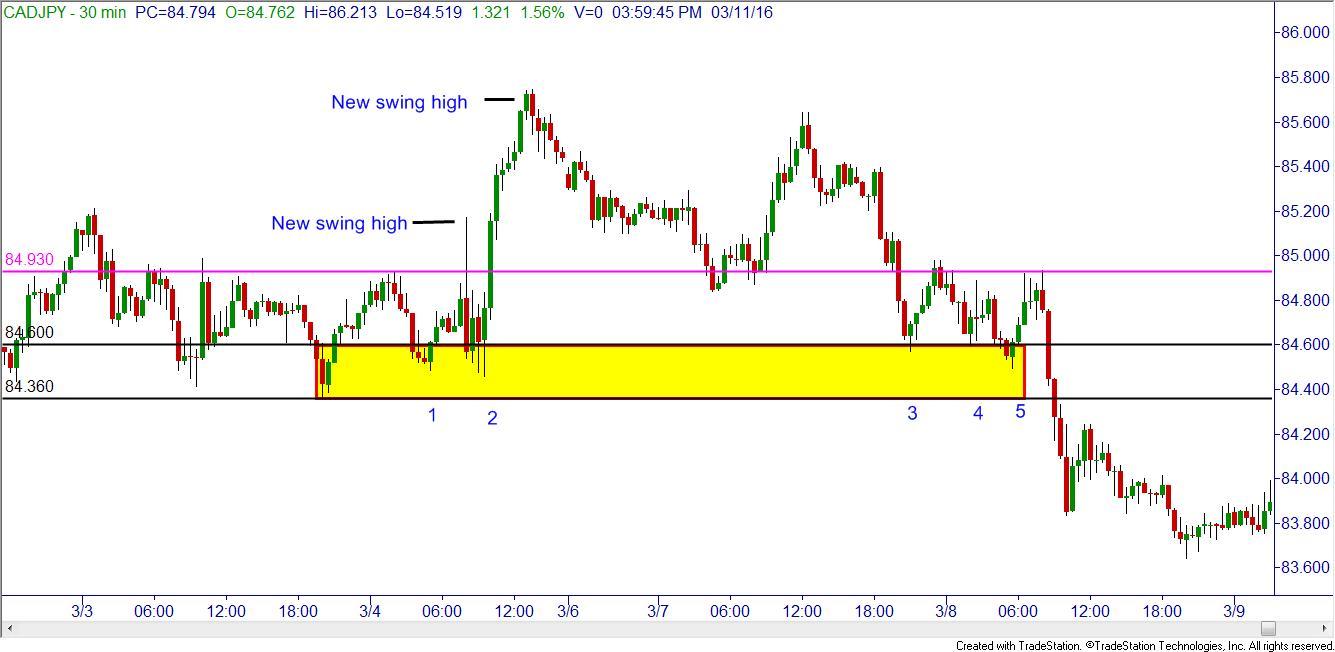
On this 30 minute CADJPY chart, I’ve marked in several things. The first is the demand zone at 84.60 to 84.36. Few of us would have expected the first move to the upside. However, the first entry at the blue “1” would have been your first potential entry to go long at the demand zone. Obviously, at least a two to one reward to risk was achieved. Now, what happens when price pulls back to that zone again, marked “2”? Again, the conservative traders won’t take that trade. But the helpful hint this week is as follows: when the move up from the point marked 1 breaks to a new high, I believe there must still be enough demand to give me another trade at the same zone. Notice how the pink line high of 84.93 was easily broken by the move up from point 1. This gives me permission in my trading plan to take another trade at point 2. Notice the very small bounces at points 3, 4 and 5. While each touched the demand zone, none of the bounces could break past previous highs, which indicates a diminishing level of demand, hence no new trades there.
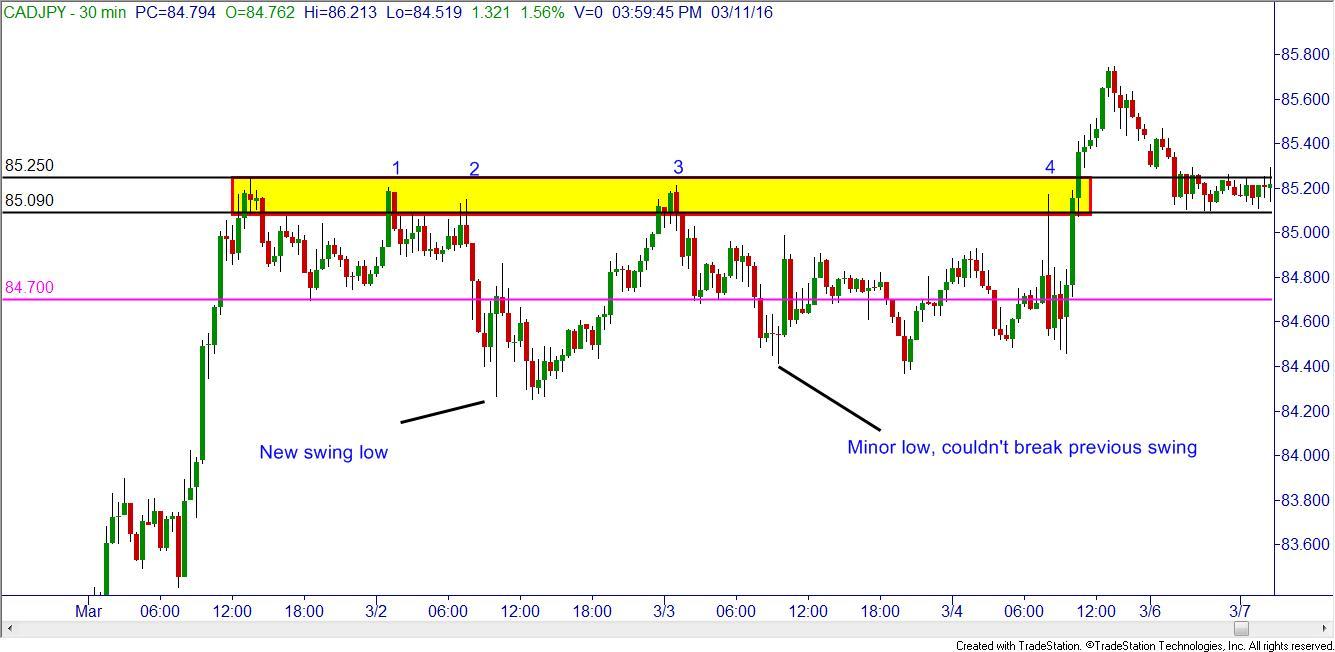
Let’s look at the same chart, but now checking out a supply zone. Using our rules, taking a trade at point 1 makes sense as this is the first entry. Taking a trade at point 2 would break the rule for a new entry as the move from 1 did not make a new low. Taking a trade at point 3 would make sense as the move from point 2 made a new low. Notice the move from 3, however. It did make a new minor low, telling me that the supply-demand equation should have me looking for short trades. When price hit the level at point 4, this would be a new entry for extremely aggressive traders to go short. Why extremely aggressive? Because one of our Odds Enhancers says to avoid levels with too many touches. In my humble opinion, when a new low (or high) has been formed, it seems to me that some institution has decided to start moving things again at that level. I don’t want to complicate things by getting into HOW or WHY an institution may enter more buy or sell orders over time, but suffice it to say, they DON’T put in just one massive order at a price point and forget about it. Just like we can do, they may be adding or subtracting from their positions over time. With this pattern, it seems to me that they are ADDING to a position at a certain level. Or not, but the pattern works much of the time.
So there you have it! A simple rule to help figure out if a zone is still worthy of your money. If a new high is formed from a demand zone, you can consider entering a long trade on the next touch. If a new low is formed from a supply zone, you can consider entering a short trade on the next touch. Always go for at least a three to one reward to risk, follow the simple rules and, I expect, you will be trading for years to come!
Information on these pages contains forward-looking statements that involve risks and uncertainties. Markets and instruments profiled on this page are for informational purposes only and should not in any way come across as a recommendation to buy or sell in these assets. You should do your own thorough research before making any investment decisions. FXStreet does not in any way guarantee that this information is free from mistakes, errors, or material misstatements. It also does not guarantee that this information is of a timely nature. Investing in Open Markets involves a great deal of risk, including the loss of all or a portion of your investment, as well as emotional distress. All risks, losses and costs associated with investing, including total loss of principal, are your responsibility. The views and opinions expressed in this article are those of the authors and do not necessarily reflect the official policy or position of FXStreet nor its advertisers.